norse900
CBT failure
 "half 'n half"
Posts: 13 
|
Post by norse900 on Sept 18, 2013 23:32:25 GMT
Norway isn't quite that bad. At least not here on the west coast, since we've got the North Sea just outside our windows... Lots of rain, but usually not much snow.
I don't know much about carb icing. I'm too much of a pidgeon for that!!
PS. My mum is British, so I've been over once or twice...
|
|
|
|
Post by m40man on Sept 19, 2013 13:35:51 GMT
I'll do my best re. photos of the pizza-tray. ("Left-overs" from a Snudda-tray from Ikea (£5,50)). I hear that your houses are well insulated, & that you stay indoors and drink beer. Could you stop for a moment & get your camera out  ? |
|
norse900
CBT failure
"half 'n half"
Posts: 13
|
Post by norse900 on Sept 19, 2013 19:50:13 GMT
One thing is getting the camera out, -another one is making something sensible out of what gets through the lens... I'm far from any expert, but I trust that it might be useful for someone, this essay might be moved to another (more appropriate DIY-thread of some sort) So, Here it goes..: The “KIT”: 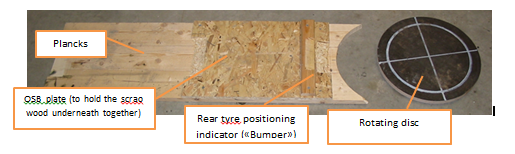 The rotating disc is made from an old pizza tray I had lying around. (Ikea - "Snudda". I would guess the price is somewhere around £5,- for a new one..) The ramp is made out of scrap wood I had lying around… Here’s what I’ve done: I removed the top and bottom plates (I used the original wood plates for something else a long time ago…). Then I put a plywood plate onto the inner plate of the rotating disc. (The outer plate lies directly against the floor when it is in use). However, the added height from the rotating plate made it much heavier to get the bike onto the centre stand, so I made myself an additional "ramp". The ramp serves 3 purposes: 1. The ramp heightens the rear (levels out the difference in height compared to the flat floor). This makes the bike go just as easy onto the centre stand, as if it was “on ground”. (It would be even easier if you add even a bit more height underneath the rear tyre than what I’ve used (within reason, of course). 2. The ramp has got a small "stopper" so that I know where to place the rear . When it “bumps” on the stopper, the centre stand will be positioned at the middle of the rotating disc when it’s lowered onto the disc. When I get home, I just roll onto the ramp till I can feel the little "bump", and I know it should be alright… 3. The length of the ramp shows how much free space I need to spin the bike around. I place the ramp next to any obstacle, and if there is room for the ramp, there will be room for the bike to spin around. How do I use it?: The bike is rolled onto the ramp. Then the rotating plate is placed underneath (flipped under using the foot while holding the bike). The rear tyre is placed towards the “bumper”, and the bike is lifted onto the centre stand. (It looks as if the rear tyre is still resting onto the ramp, but it isn’t...) When it's done, I spin the bike around by pressing down the back of the saddle (with or without removing the ramp, -it doesn't matter. If the ramp is left as it was, its "ready to go" next time I park inside.) 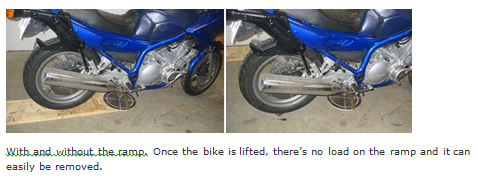 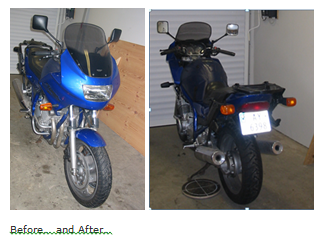 Rotating plate. (The white lines were used to place the centre stand correctly onto the plate (-before I got the idea of making the ramp…) 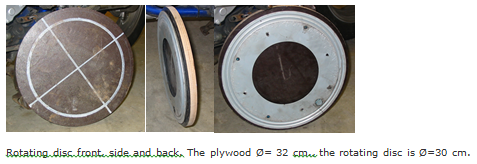 Ramp: (heights + using ramp for measure) 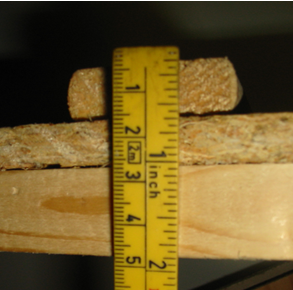 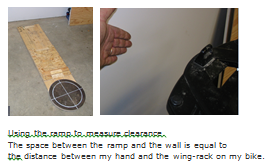 I guess the pizza tray might just be used as it is (just unscrew the wooden base plate to lower the height). Then put some pieces of wood or whatever you’ve got (a pile of old paperbacks would probably also do the trick) to heighten the rear so that it's easy to put the bike on the centre stand. Without anything, -well, -I'd call it unhealthy exercise (-at best).. |
|
|
|
Post by rowlf on Sept 19, 2013 21:16:57 GMT
One thing is getting the camera out, -another one is making something sensible out of what gets through the lens... I'm far from any expert, but I trust that it might be useful for someone, this essay might be moved to another (more appropriate DIY-thread of some sort) So, Here it goes..: The “KIT”: The rotating disc is made from an old pizza tray I had lying around. (Ikea - "Snudda". I would guess the price is somewhere around £5,- for a new one..) The ramp is made out of scrap wood I had lying around… Here’s what I’ve done: I removed the top and bottom plates (I used the original wood plates for something else a long time ago…). Then I put a plywood plate onto the inner plate of the rotating disc. (The outer plate lies directly against the floor when it is in use). However, the added height from the rotating plate made it much heavier to get the bike onto the centre stand, so I made myself an additional "ramp". The ramp serves 3 purposes: 1. The ramp heightens the rear (levels out the difference in height compared to the flat floor). This makes the bike go just as easy onto the centre stand, as if it was “on ground”. (It would be even easier if you add even a bit more height underneath the rear tyre than what I’ve used (within reason, of course). 2. The ramp has got a small "stopper" so that I know where to place the rear . When it “bumps” on the stopper, the centre stand will be positioned at the middle of the rotating disc when it’s lowered onto the disc. When I get home, I just roll onto the ramp till I can feel the little "bump", and I know it should be alright… 3. The length of the ramp shows how much free space I need to spin the bike around. I place the ramp next to any obstacle, and if there is room for the ramp, there will be room for the bike to spin around. How do I use it?: The bike is rolled onto the ramp. Then the rotating plate is placed underneath (flipped under using the foot while holding the bike). The rear tyre is placed towards the “bumper”, and the bike is lifted onto the centre stand. (It looks as if the rear tyre is still resting onto the ramp, but it isn’t...) When it's done, I spin the bike around by pressing down the back of the saddle (with or without removing the ramp, -it doesn't matter. If the ramp is left as it was, its "ready to go" next time I park inside.) Rotating plate. (The white lines were used to place the centre stand correctly onto the plate (-before I got the idea of making the ramp…) Ramp: (heights + using ramp for measure) I guess the pizza tray might just be used as it is (just unscrew the wooden base plate to lower the height). Then put some pieces of wood or whatever you’ve got (a pile of old paperbacks would probably also do the trick) to heighten the rear so that it's easy to put the bike on the centre stand. Without anything, -well, -I'd call it unhealthy exercise (-at best).. Brilliant. I might try that myself. Sorry Wullie and I nearly obscured your excellent post. Now I must google a local Ikea |
|
norse900
CBT failure
"half 'n half"
Posts: 13
|
Post by norse900 on Sept 25, 2013 22:15:06 GMT
Got the exhaust downpipes and distributor for my divvy900 yesterday, so I removed the old system...
I've been looking around Ebay to see if someone has "the whole works" (gaskets, clamps (for the distributor) AND the copper gaskets between the downpipes and the cylinder.
Does anyone out there know any suppliers who has it all, and ships outside the UK?
(Since all goods with value > ~£20 (NOK 200) needs to be declared for norwegian VAT, the couriers charge an extra fee for declaring the goods. 2 different parcels = double "courier handling fee", which is even more than the VAT...)
I like supporting the suppliers, NOT the couriers! (I'd also like to support local suppliers, but they're actually charging my undies for the 6 gaskets...)
Any good suppliers out there that you would recommend, Anyone? :-)
|
|
mucker2205
CBT Hero
 well nice to be here
Posts: 46
|
Post by mucker2205 on Oct 1, 2013 16:13:09 GMT
I had to swap my shock as i blew the seal, good job i had the spare one.
|
|
|
|
Post by bluevinny on Oct 2, 2013 18:12:29 GMT
Replaced the tired rear shock with a youngish one from a Fazer 600. The old shock had been playing up for a long time, but had to change it when the back of the bike seemed to let go while turning a corner at a junction. Looks like the Fazer 600 shock is rebuildable, so will pop it off the bike to recondition with new oil and gas. Balanced the carbs. First time I've ever done this and was straight forward following Mr Haynes's instructions. One result is that the engine is easier to start . |
|
norse900
CBT failure
"half 'n half"
Posts: 13
|
Post by norse900 on Oct 3, 2013 19:09:43 GMT
Did you use a kit to measure your carbs, and if so; what kind, and would you recommend it (or not)?
|
|
|
|
Post by rowlf on Oct 3, 2013 19:38:06 GMT
Did you use a kit to measure your carbs, and if so; what kind, and would you recommend it (or not)? Synchronizing I have used these, very effective and very easy to use. £45 from Busters on UK Ebay.  |
|
norse900
CBT failure
"half 'n half"
Posts: 13
|
Post by norse900 on Oct 3, 2013 21:07:04 GMT
Seems like Buster's out of business on Ebay. Found some that looked similar in USA, but...
Maybe I'm just not good enough at looking... ;-)
|
|
|
|
Post by rowlf on Oct 3, 2013 21:27:02 GMT
|
|
norse900
CBT failure
"half 'n half"
Posts: 13
|
Post by norse900 on Oct 4, 2013 7:09:22 GMT
When buying through Ebay I usually get the UK vat off, but have to pay the Norwegian VAT (25%) on the item incl. freight. In addittion, the courier services charge an addittional fee for the VAT handling (approx £16). Considering the freight for the item (£58) in addition to the item itself (£45), I'd rather ask for a delivery adress in the UK (for instance my cousin), and get it sent as a "normal parcel". The courier service has not even ONCE managed to deliver anyways!!!(?) (FRAUD, if you ask me!) Thanks for checking!!!!!  |
|
|
|
Post by bluevinny on Oct 4, 2013 18:59:49 GMT
Should have mentioned that I did cheat and used a set of vacuum gauges that rowlf has described. But I'm not as good as those who skip the gauges and listen through tubes to the pop-pop of the carbs to balance them  . |
|
norse900
CBT failure
"half 'n half"
Posts: 13
|
Post by norse900 on Oct 4, 2013 19:31:55 GMT
If being smart is cheating, I'll cheat aswell  |
|
|
|
Post by m40man on Oct 6, 2013 14:09:33 GMT
Took the fairing off to investigate failed horn & non-working parking light. Turns out my horn is no longer horny, not worked out why the parking light ain't working though  . |
|
|
|
Post by m40man on Oct 6, 2013 14:45:17 GMT
Today I found a broken wire hiding under the rubber gromit of the parking light bulb fitting, & fixed it . |
|
|
|
Post by m40man on Oct 6, 2013 16:08:36 GMT
Today I replaced my knackered Fiamm horn with a ''spare'' OEM Honda VT500E horn - gets me legal again in time for the commute . |
|
|
|
Post by teejayexc on Oct 6, 2013 16:13:14 GMT
You put everything else back properly ?  |
|
|
|
Post by neilmud Lord Protector on Oct 6, 2013 16:41:21 GMT
Today I found a broken wire hiding under the rubber gromit of the parking light bulb fitting, & fixed it . Did it fix your shat nav charger or are you still blaming Trev for burgering your electrickery when he had it apart Neil |
|
|
|
Post by m40man on Oct 6, 2013 17:21:29 GMT
You put everything else back properly ? You'd never know you'd been there . |
|
|
|
Post by teejayexc on Oct 6, 2013 19:02:11 GMT
Today I found a broken wire hiding under the rubber gromit of the parking light bulb fitting, & fixed it . Did it fix your shat nav charger or are you still blaming Trev for burgering your electrickery when he had it apart Neil Not guilty m'lud, That there Clive bloke was in charge of electrickery  |
|
huw
Newbie

Posts: 7
|
Post by huw on Oct 6, 2013 21:43:39 GMT
I fitted a new sump gasket today, took longer to clean the old one off the sump than it took to get to and remove the sump!
I've decided to fit a new oil filter whilst I'm at it and will be getting that Tuesday, does anyone know how much oil I need?
|
|
|
|
Post by m40man on Oct 6, 2013 21:46:47 GMT
does anyone know how much oil I need? 3.4 litres, with a filter change.( maybe more if much remained in the sump when you removed it!) |
|
huw
Newbie
Posts: 7
|
Post by huw on Oct 6, 2013 21:56:37 GMT
does anyone know how much oil I need? 3.4 litres, with a filter change.( maybe more if much remained in the sump when you removed it!) Thank you! |
|
norse900
CBT failure
"half 'n half"
Posts: 13
|
Post by norse900 on Oct 7, 2013 21:13:59 GMT
Today, exhaust gaskets and clamps arrived from UK, so I've put on new exhaust pipes and distribution box. Now the bike both looks AND sounds nice. Seems like the motor is running smoother too.
|
|
|
|
Post by m40man on Oct 8, 2013 16:58:53 GMT
Today I sold my D9 ( contrary to rumours that I sold it yesterday .) |
|
|
|
Post by bluevinny on Oct 29, 2013 21:16:31 GMT
Boike back on the road after having stripped the rear suspension to grease the bearings . Forgot just how much has to be removed to properly access the rear shock upper mounting bolt. All bearings were fine, except the knuckle/dog-bone ones which were a dirty brown. With just the swingarm attached to the frame, it didn't move smoothly as the swingarm to frame bearing races were slightly brinelled  . Should have been just a bearing greasing, but the work expanded to treat corrosion. Surface rust on the swingarm, so the worse of the paint was stripped off and resprayed using aerosols. Took some time to complete, so next time, the swingarm will go for powdercoating. Part of the frame around the rear shock and inner mudguard was aerosoled and the Wingrack and rear caliper torque arms powdercoated as they were in a bad way; they now look the dog's biz. The bike sits on a Fazer 600 rear shock and this was sent away for an oil and gas change. Now the bike is back together, it feels more confident through corners and on the straight I guess due to the freed-off swingarm and rebuilt rear shock . Ah, it's great to be back. |
|
|
|
Post by brewerswhoop on Nov 5, 2013 8:10:23 GMT
Also just done SA and rear suspension bearings. Started out as planned linkage inspection/greasing. Of course, it was all worse than it looked when things started coming apart. So it ended up as pulling the swing arm and giving it the mother of all wire brushings and hameriting (can’t afford powder coating or owt at present), replacing both SA bearings, the dogbone to SA bearings and the shock to linkage bearings, and derusting and spraying the frame cross member.
Still, now got that feeling of contentment a gentleman experiences when his rear end is in fine fettle!
|
|
|
|
Post by bluevinny on Nov 8, 2013 21:06:24 GMT
Added extendas to the rear hugger and front fenda extenda, thanks to a Halfords 5 litre oil can. The hugger was extended to reduce the amount of water kicked up by the rear wheel: - washing down the dog bones on to the dog bone/knuckle bearing (the bearing was dry when it was apart recently).
- sluicing around the centrestand.
The rear extenda is fairly well hidden, but may paint the front one black to make it look less conspicuous and Heath Robinson-nesque.  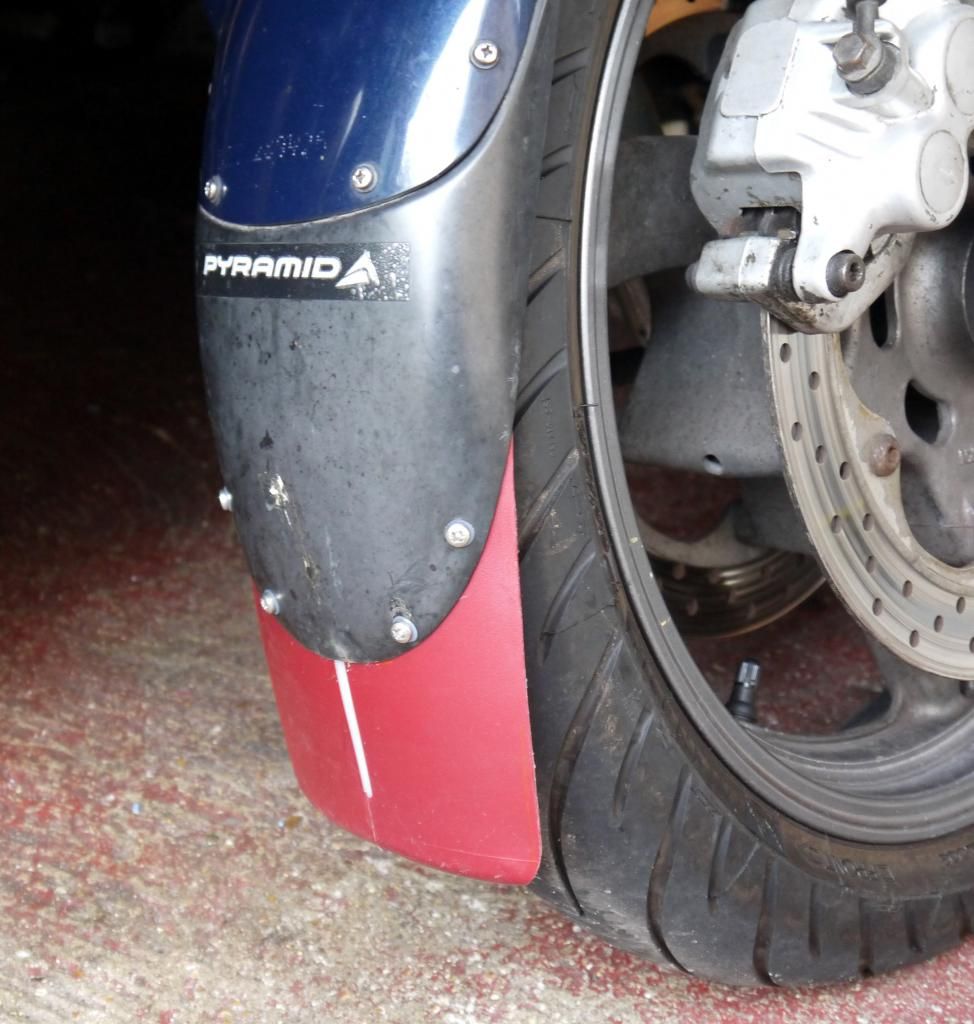 |
|
|
|
Post by bluevinny on Nov 10, 2013 20:42:45 GMT
'Welded' up the long crack in the left-side plastic panel just in front of the saddle. Created a V-shape channel along the crack on the reverse of the panel, then used a soldering iron to 'tack weld' the plastic along the crack to hold the parts together. Next the channel was filled with ABS cement, made up from dissolving Lego bricks in acetone. The acetone evaporates leaving behind new ABS in the channel. So far, the repair has held and seems strong . |
|


 ?
?

 plus we need the money more than they do

 .
.


 .
.