|
|
Post by crickleymal on May 15, 2014 9:12:26 GMT
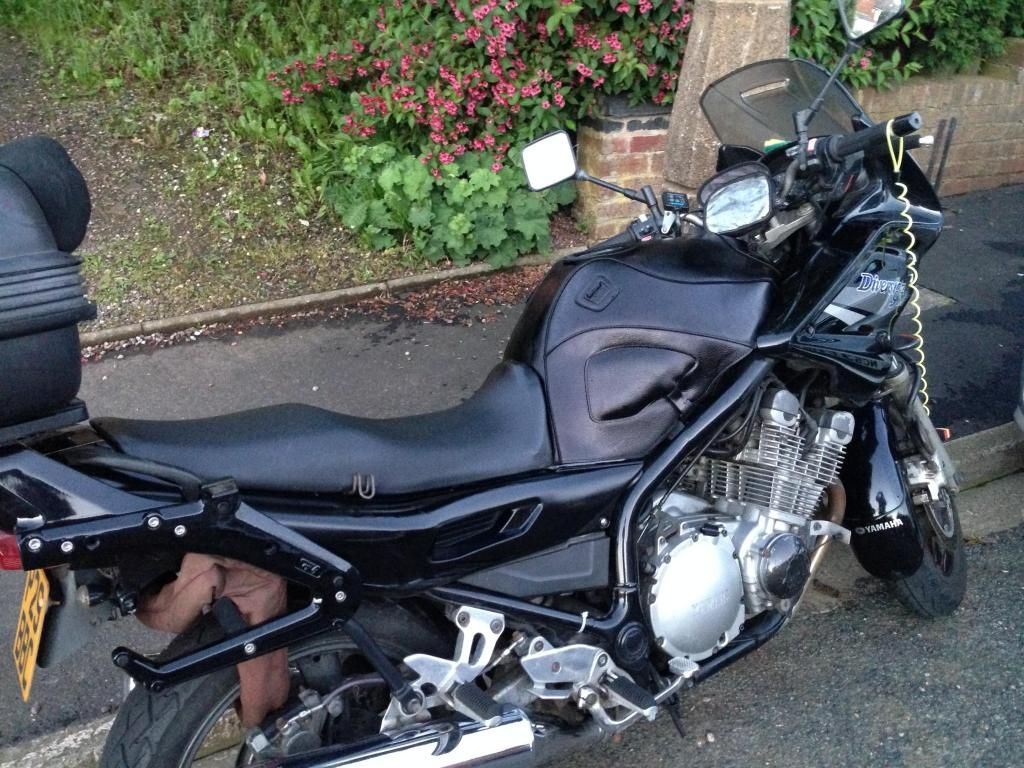
New rear pads, cleaned the caliper. I think one piston/pad had virtually stuck in place. Still all working now. New clutch cable too.
|
|
|
|
Post by pilgrim on May 15, 2014 19:53:05 GMT
New rear pads, cleaned the caliper. I think one piston/pad had virtually stuck in place. Still all working now. New clutch cable too. Rear brake is always iffy, it doesn't seem to do too much apart from gently slow the bike or lock the rear wheel. It's like a hand brake on a car for real stopping power.......  |
|
|
|
Post by megah0 on May 15, 2014 21:31:25 GMT
New fender extender, fork brace, new stainless bolts on most visible bits, shiny shiny.
|
|
|
|
Post by crickleymal on May 16, 2014 8:06:40 GMT
New rear pads, cleaned the caliper. I think one piston/pad had virtually stuck in place. Still all working now. New clutch cable too. Rear brake is always iffy, it doesn't seem to do too much apart from gently slow the bike or lock the rear wheel. It's like a hand brake on a car for real stopping power....... Yes I know. I got to work one day on my ZZR and found that what was a good tyre when I set out had miraculously turned into one showing the canvas in a stripe down the centre. I took it to Protyre and as he was removing the rear wheel, the brake shoes fell out becuase the had rusted to bits. Still rode the bike home. Having said that the back brake is transformed now, it's twice as effective as it once was. |
|
|
|
Post by pilgrim on May 16, 2014 20:45:33 GMT
Had the tank off for the third time to do a re-spray. The reason is a recuring bubble in the paint at the seat end. There seems to be a small area there, about the size of a 10p bit, which paint doesn't stick to. The first time I did it the tank had original factory paint so it's been there since manufacture. Why it recurs I don't know...........  |
|
|
|
Post by ContourMac on May 16, 2014 21:40:00 GMT
Had the tank off for the third time to do a re-spray. The reason is a recuring bubble in the paint at the seat end. There seems to be a small area there, about the size of a 10p bit, which paint doesn't stick to. The first time I did it the tank had original factory paint so it's been there since manufacture. Why it recurs I don't know...........
How excited do you get when riding the bike? 
|
|
|
|
Post by crickleymal on May 19, 2014 6:37:41 GMT
Modified the headlight circuit on Sunday. Two 40A relays from Maplin + some crimp terminals, heavy duty flexible cable and an inline fuse holder. Oh yes and a H4 headlight connector from Ebay. Job's a good 'un. I haven't measured the voltage on the bulb but it should be a couple of volts higher. Plus the circuit is convertible back to original if one of the relays fails simply by swapping over a couple of plugs.
|
|
|
|
Post by Vise1987 on May 19, 2014 8:28:14 GMT
Did absolutely nothing except take it for a good old run out to Squires, and a little tour around Selby etc. Nice to get out of town and stretch the gears out.
Really enjoyable to ride out on
Found the rear brake squeaking a bit however while riding but stops on pressure so I think the piston still sticking a bit... Job for another weekend.
|
|
|
|
Post by neilmud Lord Protector on May 25, 2014 18:10:15 GMT
Not the Divi (that went a few years ago) (we dont have a what did yo do to your bike today) (this is not a rebuild so can't use that thread) anyway fitted the O2 Kev mod that arrived from Oz yesterday 10 min to find the connectors fit the unit in line & tie wrap it to the horn bracket. The out to play what a difference it now pulls really strongly from really low revs & seems much more punchy in mid range & top end is as good as before if not better have not tried to crack the ton with this set up as no private road available but it did not seem to need to go flat out it is so punchy now its a delight to chuck in & steam out of corners (even better than before) left a lot of quicker/bigger bikes in its wake today just so long as there was not a long enough straight for them to get their own back. Next on the cards is a better air filter & air box mods to help the breathing. These are things that should have been right from the factory but its screwed down by other countries emission laws  Neil |
|
|
|
Post by pilgrim on May 25, 2014 20:27:13 GMT
Not the Divi (that went a few years ago) (we dont have a what did yo do to your bike today) (this is not a rebuild so can't use that thread) anyway fitted the O2 Kev mod that arrived from Oz yesterday 10 min to find the connectors fit the unit in line & tie wrap it to the horn bracket. The out to play what a difference it now pulls really strongly from really low revs & seems much more punchy in mid range & top end is as good as before if not better have not tried to crack the ton with this set up as no private road available but it did not seem to need to go flat out it is so punchy now its a delight to chuck in & steam out of corners (even better than before) left a lot of quicker/bigger bikes in its wake today just so long as there was not a long enough straight for them to get their own back. Next on the cards is a better air filter & air box mods to help the breathing. These are things that should have been right from the factory but its screwed down by other countries emission laws Neil You seem to have lost the ability to read Neil. Look at thread title.  However there seems to be a general technical thread or even the general board, I'd ask admin to move your post, at least out of "What did you do to your divvy today? rrrrhole!  |
|
|
|
Post by neilmud Lord Protector on May 25, 2014 23:31:35 GMT
Not the Divi (that went a few years ago) (we dont have a what did yo do to your bike today) (this is not a rebuild so can't use that thread) anyway fitted the O2 Kev mod that arrived from Oz yesterday 10 min to find the connectors fit the unit in line & tie wrap it to the horn bracket. The out to play what a difference it now pulls really strongly from really low revs & seems much more punchy in mid range & top end is as good as before if not better have not tried to crack the ton with this set up as no private road available but it did not seem to need to go flat out it is so punchy now its a delight to chuck in & steam out of corners (even better than before) left a lot of quicker/bigger bikes in its wake today just so long as there was not a long enough straight for them to get their own back. Next on the cards is a better air filter & air box mods to help the breathing. These are things that should have been right from the factory but its screwed down by other countries emission laws Neil You seem to have lost the ability to read Neil. Look at thread title. However there seems to be a general technical thread or even the general board, I'd ask admin to move your post, at least out of "What did you do to your divvy today? rrrrhole! I can read wot I said "Not the Divi (that went a few years ago) (we don't have a what did you do to your bike today) (this is not a rebuild so can't use that thread) Neil |
|
|
|
Post by m40man on Jun 1, 2014 10:35:14 GMT
Finally got round to fitting my Scottoiler.
|
|
|
|
Post by pilgrim on Jun 1, 2014 13:55:21 GMT
Picked up my new pipes from my cousins house near Pontivy. Couple of hours later they're on the bike:  Uniform in colour for now and very shiny. Detail is well finished and I do like the collectors:  Collars are SS too and look the part with the Allen nuts:  If you want a good tool to get them off then an 8mm Allen key with ball end on the long reach and an 8mm pipe spanner pushed onto the short reach acting as an extended lever. Sandy Bike Spares £129, free delivery in the UK. Also, with the exhaust off it's so much easier to carry out an oil/filter change. Done! |
|
|
|
Post by alan292 on Jun 1, 2014 19:20:05 GMT
Picked up my new pipes from my cousins house near Pontivy. Couple of hours later they're on the bike: Uniform in colour for now and very shiny. Detail is well finished and I do like the collectors: Collars are SS too and look the part with the Allen nuts: If you want a good tool to get them off then an 8mm Allen key with ball end on the long reach and an 8mm pipe spanner pushed onto the short reach acting as an extended lever. Sandy Bike Spares £129, free delivery in the UK. Also, with the exhaust off it's so much easier to carry out an oil/filter change. Done! A treat for the eyes......  ...very nice but now you will have to clean your brake pedal...its letting the show down....  |
|
|
|
Post by pilgrim on Jun 1, 2014 20:43:44 GMT
I know alan292, lots of crud behind the oil cooler too, and then there's the gear change lever........... Taken off and cleaned often.  |
|
|
|
Post by neilmud Lord Protector on Jun 1, 2014 23:45:24 GMT
I know alan292, lots of crud behind the oil cooler too, and then there's the gear change lever........... Taken off and cleaned often. Come on its an old D6 its only the crud that keeps em together  |
|
|
|
Post by alan292 on Jun 17, 2014 6:16:09 GMT
Finally got my new to me lower fairings fitted after painting.

|
|
|
|
Post by robski on Jun 17, 2014 23:17:10 GMT
quite fancy some lower fairings they look good, did you pick them up secondhand or new
|
|
|
|
Post by alan292 on Jun 18, 2014 19:20:41 GMT
quite fancy some lower fairings they look good, did you pick them up secondhand or new They were 2nd hand Rob....I saw an ad on gumtree for a full bike ...with lower fairings if req...I offered the guy £40 for them...they are around that mark on ebay |
|
|
|
Post by pilgrim on Jun 22, 2014 19:04:28 GMT
I've found some Diversion 'N' stickers to replace the 17 years' old ones.  Then I'll finish the tank, it had a leak and repaired with Plastic Padding Leak Fix.  Will post up the final result of course. |
|
|
|
Post by pilgrim on Jun 29, 2014 19:11:13 GMT
Spraying done today and new Yamaha logos on the tank:  The bike's going to the 'garage' Tuesday for valve shims. It's not been done before I think........at least since I've owned the bike. |
|
|
|
Post by pilgrim on Jul 4, 2014 18:17:20 GMT
Well no shims were replaced, all within tolerance.
I had two points needing some attention soon, steering bearings and cam chain needs replacing (it's getting slack and the tensioner won't anymore).
Will deliberate about that.
|
|
|
|
Post by davecatleugh on Jul 5, 2014 19:42:35 GMT
Fixed the vacuum fuel pump on my '95 XJ600.
After figuring out (with the help of you fine people on this board), that the reason my bike wouldn't go was the fuel pump, I sent of for a cheap electric replacement from eBay. While I was waiting, I thought I might as well take the vacuum pump apart to see how it worked. Gave the inside, especially the three diaphragms a good clean with carb. cleaner, re-assembled it, and tried it out. Good as new - running great. (Davey's on the road again!)
Before I cleaned it I figured that the large diaphragm was OK by sucking and blowing through ther tube marked "P" (pulse?). I could hear the diaphragm moving, and there was obviously no holes in, or I would have been able to blow air through. When I blew, and sucked,through the fuel inlet/outlet, there was little difference whether I was going with or against the direction of petrol flow. After cleaning, this changed dramatically. So the Haynes manual is wrong when it says there is no easy way to test these pumps, and that they are not user-servicable.
|
|
|
|
Post by bobh on Jul 5, 2014 22:13:43 GMT
[quote author=" davecatleugh" source="/post/241983/thread" timestamp="1404589355"So the Haynes manual is wrong when it says there is no easy way to test these pumps, and that they are not user-servicable.[/quote] Unfortunately Mr Haynes can occasionally be, shall we say, misleading in the advice he gives. But we'd be a lot worse off without him. |
|
|
|
Post by teejayexc on Jul 6, 2014 7:21:27 GMT
Fixed the vacuum fuel pump on my '95 XJ600. After figuring out (with the help of you fine people on this board), that the reason my bike wouldn't go was the fuel pump, I sent of for a cheap electric replacement from eBay. While I was waiting, I thought I might as well take the vacuum pump apart to see how it worked. Gave the inside, especially the three diaphragms a good clean with carb. cleaner, re-assembled it, and tried it out. Good as new - running great. (Davey's on the road again!)Before I cleaned it I figured that the large diaphragm was OK by sucking and blowing through ther tube marked "P" (pulse?). I could hear the diaphragm moving, and there was obviously no holes in, or I would have been able to blow air through. When I blew, and sucked,through the fuel inlet/outlet, there was little difference whether I was going with or against the direction of petrol flow. After cleaning, this changed dramatically. So the Haynes manual is wrong when it says there is no easy way to test these pumps, and that they are not user-servicable. Yes, but was he 'wearing different clothes again' ? Good to hear you're up and running and you've even got a spare pump now |
|
|
|
Post by Deleted on Jul 11, 2014 3:44:43 GMT
Fixed the vacuum fuel pump on my '95 XJ600. After figuring out (with the help of you fine people on this board), that the reason my bike wouldn't go was the fuel pump, I sent of for a cheap electric replacement from eBay. While I was waiting, I thought I might as well take the vacuum pump apart to see how it worked. Gave the inside, especially the three diaphragms a good clean with carb. cleaner, re-assembled it, and tried it out. Good as new - running great. (Davey's on the road again!)Before I cleaned it I figured that the large diaphragm was OK by sucking and blowing through ther tube marked "P" (pulse?). I could hear the diaphragm moving, and there was obviously no holes in, or I would have been able to blow air through. When I blew, and sucked,through the fuel inlet/outlet, there was little difference whether I was going with or against the direction of petrol flow. After cleaning, this changed dramatically. So the Haynes manual is wrong when it says there is no easy way to test these pumps, and that they are not user-servicable. Yes, but was he 'wearing different clothes again' ? Good to hear you're up and running and you've even got a spare pump now And he's turning handouts down |
|
|
|
Post by pilgrim on Jul 20, 2014 20:46:28 GMT
Well no shims were replaced, all within tolerance. I had two points needing some attention soon, steering bearings and cam chain needs replacing (it's getting slack and the tensioner won't anymore). Will deliberate about that. Unexpected problem arose after the bike came back from the workshop. I didn't notice at first but it had developed a 'burble' when accelerating gently around 2,500 revs which cleared from 3k+. Earlier in the week I found a spark plug cap (no.1) which had all but disintegrated and that spark plug wasn't coloured the same as the rest so both were re-newed. No change to the 'burble'though. Having thought back through the garage work I knew it was necessary to lift the carbs off to get free access to inspect the shims/gaps. Today I stripped down to the inlet manifolds and, guess what, I found the inlet rubber on cylinder no.3 was not seated properly. As there are two screwed clips on each rubber the upper one (carb side) had a chewed head so I think they released the carbs with the lower clips. When they pushed the rubbers and carbs back on the 3rd one didn't seat properly and let air leak in at the manifold. I carefully put all back together paying extra attention to the rubbers and clips. My test ride proved I was right! "Good deduction Mr Holmes"............ ..........."Thank you Dr Watson" |
|
|
|
Post by neilmud Lord Protector on Jul 20, 2014 23:29:33 GMT
Well no shims were replaced, all within tolerance. I had two points needing some attention soon, steering bearings and cam chain needs replacing (it's getting slack and the tensioner won't anymore). Will deliberate about that. Unexpected problem arose after the bike came back from the workshop. I didn't notice at first but it had developed a 'burble' when accelerating gently around 2,500 revs which cleared from 3k+. Earlier in the week I found a spark plug cap (no.1) which had all but disintegrated and that spark plug wasn't coloured the same as the rest so both were re-newed. No change to the 'burble'though. Having thought back through the garage work I knew it was necessary to lift the carbs off to get free access to inspect the shims/gaps. Today I stripped down to the inlet manifolds and, guess what, I found the inlet rubber on cylinder no.3 was not seated properly. As there are two screwed clips on each rubber the upper one (carb side) had a chewed head so I think they released the carbs with the lower clips. When they pushed the rubbers and carbs back on the 3rd one didn't seat properly and let air leak in at the manifold. I carefully put all back together paying extra attention to the rubbers and clips. My test ride proved I was right! "Good deduction Mr Holmes"............ ..........."Thank you Dr Watson" You have a bike shop in France run by Holmes & Watson  Wots it called The Sign of Four cylinders  Le chien de la basketcase 600 Neil |
|
|
|
Post by pilgrim on Jul 21, 2014 18:05:13 GMT
My test ride proved I was right! "Good deduction Mr Holmes"............ ..........."Thank you Dr Watson" You have a bike shop in France run by Holmes & Watson Wots it called The Sign of Four cylinders Le chien de la basketcase 600 Neil Maigret and Poirot actually, if you know how to pronounce tnem correctly Neil. |
|
|
|
Post by showaddydadito on Jul 24, 2014 11:50:23 GMT
I took the exhaust off.
Then I put it back on.
A man's gotta have a hobby.
|
|


 ...very nice but now you will have to clean your brake pedal...its letting the show down....


 Le chien de la basketcase 600