|
|
Post by PrincessPunk on Apr 20, 2016 11:19:00 GMT
After scouring the internet for two straight days, even consulting the trusty Haynes manual, i cannot figure out for the life of me what the deal is with the rear caliper.
I've one snapped off bleed valve, the one on the outside of the caliper, to which the bike shop i went to handed me a bleedable banjo... trouble is, the calliper doesnt have a banjo bold leading into it, the pipe just goes in direct, faaaantastic, wasted a few quid there.
i have a feeling that with the two bleed valves its a case of bleeding it at the outside (farthest from the wheel, closest to me) valve first then doing so with the inside one (closest to the wheel, farthest from me) almost like the twin system at the front on a truimph where the hose goes all the way to the left caliper first then to the right except the split is inside the one caliper instead of having a hose going between two, is this correct? if it is, does that mean i can bleed the system/ replace the fluid with just the one (inside) bleed valve?
Now, about replacing the brake fluid. I was all set on how to do it, then reading how to bleed this particular system in the Haynes manual has gone and confused me again! is it just as simple as with any other brake or do you have to do it in the two part way it suggests, something to do with doing the "top" part first then doing the "lower" part.
something tells me this will be waaay simpler, much faster and SO much less frustrating if i just get one of those vacuum pumps and pull the fluid straight through from the inside bleed valve - aka the furthest away part from the reservoir, but my question still stands, is that how it works? is that possible?
so many questions bit i'm SO confused by brake bleeding its unreal, i just cant seem to get my head around it, or i do then something changes! please help!?
|
|
|
|
Post by chris900divvy on Apr 20, 2016 15:04:02 GMT
Straightforward enough really. There are two bleed valves on there but generally you can get it to bleed satisfactorily just doing the one. I never tried to bleed both valves at the same time on it! On my old caliper I had one pretty awkward bleed nipple so I left it alone and just used the other one to avoid snapping it. Not difficult to get the old fluid out really just attach a tube to the bleed nipple and pump away with the brake lever. These bikes don't really give to worrying about too much though - they're best just ridden! What was wrong with the brakes to begin with anyway that's led you to want to change the fluid so soon?
|
|
|
|
Post by PrincessPunk on Apr 20, 2016 16:49:50 GMT
oh the fluid is ancient, the bikes sat outside not moving for at least a year and has done a grand total of 800 miles since 2011 so i'm pretty sure the fluid hasnt been changed since then. the front brake is basically non existent too so i thought while i'm replacing the front fluid and the pads and discs, i should do the back at the same time to keep them even. and excellent! thats so good to know  everything had just got me so confused and there was so much conflicting (or zero) information and stuff that i just had not a clue how the rear worked. now i know i can get it sorted easy and with just the one valve on another note i also noticed today while havign a clean and poke around my bike that the back pads are actually nearly full but they're a horrible shape since the old discs have an enormous divot around them so i want to replace them anyway to save only being on a tiny bit of pad and consequently ending up with the same horrible divot in the new discs. so yeah, a little clean and service to the brakes, new discs and pads then its MOT time! |
|
|
|
Post by HRHpenfold on Apr 21, 2016 8:05:46 GMT
|
|
|
|
Post by chris900divvy on Apr 21, 2016 17:01:51 GMT
oh the fluid is ancient, the bikes sat outside not moving for at least a year and has done a grand total of 800 miles since 2011 so i'm pretty sure the fluid hasnt been changed since then. the front brake is basically non existent too so i thought while i'm replacing the front fluid and the pads and discs, i should do the back at the same time to keep them even. and excellent! thats so good to know everything had just got me so confused and there was so much conflicting (or zero) information and stuff that i just had not a clue how the rear worked. now i know i can get it sorted easy and with just the one valve on another note i also noticed today while havign a clean and poke around my bike that the back pads are actually nearly full but they're a horrible shape since the old discs have an enormous divot around them so i want to replace them anyway to save only being on a tiny bit of pad and consequently ending up with the same horrible divot in the new discs. so yeah, a little clean and service to the brakes, new discs and pads then its MOT time! I see. They're great bikes, I hope you get to put some decent miles on it so you can appreciate it once you've sorted your brakes and MOT'd it. How many miles has it done? |
|
|
|
Post by m40man on Apr 21, 2016 17:13:17 GMT
..... new discs and pads ..... Plenty of heat on those disc bolts, or it'll end in tears! (It might still end in tears, with plenty of heat. But expect one or more snapped bolts if you try without! Damned locktite on them there bolts!) (If with plenty of heat you manage to loosen them, then the last one or two proves to be a bugger, make sure you nip all the others back up again, get it really hot again, & try again. That's to ease the pressure a bit on the last ones.) (I use a hot-air paint stripper to heat my nuts!) |
|
|
|
Post by chris900divvy on Apr 21, 2016 17:25:37 GMT
Good advice I had that issue with bolts snapping first time I tried removing my front discs! The rear was a lot easier though for some reason.
|
|
|
|
Post by PrincessPunk on Apr 21, 2016 17:29:28 GMT
Hehehe getting a stripper to heat up nuts... There's too many jokes there anyway, removing my mind from the gutter, brakes eh? Chris: I sooo cannot wait till I've got everything done! Haha I think the first trip once it's on the road will be down to Leeds to visit some friends, like 200 odd miles down then the same back (although now that I've got the screen on I've found it rattles so I'll have to remedy that!) it's only done about 45,000 miles, it's just sat about the last few so I'm kinda refurbishing it a bit I plan on keeping it long term M40man: thank you for the heads up! I've got a heat gun too so awesome  I've got an impact driver and a like 3 foot long torque wrench so I think if I can be smart and quick about it I should get them out should I use locktite when putting the bolts back in or will they be okay without? Also I wish they weren't Allan nuts though, I don't have a great history with them! Fingers crossed though |
|
|
|
Post by m40man on Apr 21, 2016 18:06:04 GMT
.. I've got an impact driver and a like 3 foot long torque wrench I've leave the torque wrench alone & just use the impact driver personally, until you've loosened 'em. NB: If despite good heat they still won't move, use the impact driver to give 'em a couple of whacks tightening-up, instead of loosening, then try loosening again. It can help break the seal. should I use locktite when putting the bolts back in or will they be okay without? Personally, I don't, never had one come loose. Up to you. |
|
|
|
Post by PrincessPunk on Apr 21, 2016 21:16:02 GMT
Ah okay, i thought it would help since i've got little noodle arms but if its overkill i might avoid it, ended up having to use it on the sump bolt! haha excellent, i'll avoid the locktite then, saves another trip out too so thats a plus to me i can never remember to pick any up! |
|
|
|
Post by Beehill on Apr 21, 2016 23:02:07 GMT
I sense a discrepancy here. A Blacksmith with "little noodle arms" - don't make sense to me. I must be out of touch with Blacksmiths.
Andy :-)
|
|
|
|
Post by PrincessPunk on Apr 21, 2016 23:04:01 GMT
hahaha well spotted but as any good blacksmith knows, its all about leverage i only use a little hammer and my work is quite small scale |
|
|
|
Post by satnav on Apr 22, 2016 11:56:49 GMT
One problem I had when doing mine was getting the fluid into the master cylinder to start with. Ended up squeezing the pipe between the reservoir and the cylinder to prime it. Then I could use the brake pedal as normal.
I also had an issue getting the last of the air out. What I did was loosen the bottom mounting bolt and level up the caliper to get the air closer to the bleed nipples.
|
|
|
|
Post by PrincessPunk on Apr 22, 2016 21:09:00 GMT
Just a little update. I thought today i would give my brakes a bit of a clean and get the pistons moving well in readiness for getting the discs and pads tomorrow, things started off well just giving the rear a blast with the brake cleaner. I managed to get it all apart quite easily which was a pleasant surprise and got stuck in, sacrificing my toothbrush to get a good clean. I noticed the lip of my pistons are a bit bashed and the surface has a few fairly deep scratches but i thought, hey, theyre not leaking so as long as the brake works!
I decided after giving them a preliminary clean off that i'd pump the pistons out a bit to pull any dirt and corruption out of the sort of recess, one pumped out quite easily but i dont have the strength in my hand to hold that piston down to pop out the other one a bit. This is when my troubles started, i really, really struggled to get the piston closes to me back into its recess but eventually got it to maybe sticking out by 5mm, not great but it'll do for now. Managed to get the other piston to shift but would it go back in? would. it. feck .
eventually i ended up taking the calliper off entirely to get a better angle at the piston. pushing agaisnt the floor, nothing. not even a hint of moving. put it in the vice and begun trying to lever it with absolutely everything i could find, even using heat on the caliper to try loosen things off a bit, to almost no avail, all the while with brake fluid pishing everywhere. after the heat it started to move a little then i developed a technique with using two spanners in the gap, levering agaisnt each other so they were more flat, pushing more evenly. this got the first piston right back into its space which was nice but only succeeded in getting the problematic one to sticking out five inches. at this point i thouht i'd have another do on the bike so i put it back on and proceeded to bleed the brake. now, when i went looking for a piece of pipe to do this, i was assured tihs "one man bleeding kit" would do the trick... hahaha, aaaabsolute bullshit. the "patented one way valve" is anything BUT one way, plus the bleed valve pished most of the fluid out of the screw thread and down my wheel instead of down the pipe, not a happy bunny. eventually i realised i'd almost completely poped both my pistons out again so the calliper was off again and back to the vice, i returned it to the sh*t state it was in the last time, on the bike, bled and now the brake is a piece of sh*t , zero feel yet still manages to skid. faaantastic. After cleaning that all down and reassembling the entire back half of my bike i decided to had a go at the front. didnt mess around with the pistons yet but bled the lines thorugh completely and the brake still has feck all real power at even 30, i suspect the pads are glazed (i ffffking pray they are actually and its not the frigging pistons, it sohuldnt be because the brake works, its jsut sh*t ) and i will find out if the new pads and disc make a difference tomorrow and if they dont, i'm just gonna cry and kick them for a few hours and get someone else to do it hah.
So yeah, sorry for the rant but i've worked for like 4 hours and got nothing but sore arms and brake fluid everywhere so i'm in a bit of a mood, feck hydraulic brakes and i hope that things are better tomorrow
|
|
|
|
Post by mlbv on Apr 22, 2016 22:13:44 GMT
i only use a little hammer i love nice little a ball peen... aaaand we are back in the gutter... |
|
|
|
Post by PrincessPunk on Apr 22, 2016 22:15:45 GMT
i only use a little hammer i love nice little a ball peen... aaaand we are back in the gutter... A Always gotta stay close to the gutter in my opinion |
|
|
|
Post by PrincessPunk on Apr 28, 2016 19:38:07 GMT
just a quick update, i finished off this sorry saga through the clever use of clamps and random bits of wood. i couldnt get a clamp or anything in there to squeeze the caliper down and no levering would get it to go until i realised that i could slip a piece of wood in through centre of the calliper, have a piece on the outside of the calliper on the same side as the offending piston and put a clamp on either side of the pieces of wood, therefore pushing the f*king thing back in works a charm now, brake bled and ready to stop! ... once i've got the new disc on... the story continues |
|
|
|
Post by GAv on Apr 28, 2016 22:56:00 GMT
Sorry wouldn't you have been better off bleeding the brake afterfitting the disc ?
|
|
|
|
Post by bev on Apr 29, 2016 7:36:52 GMT
Sorry wouldn't you have been better off bleeding the brake afterfitting the disc ? Why ?
They're cleaned and bled now.
I'd have done the same if I was waiting for a Wheel/disk. Though if I'd heated them up to get the pistons out I'd probably have changed the seals.
|
|
|
|
Post by GAv on Apr 29, 2016 9:22:08 GMT
Surely though when bleeding you have to pump the pedal to force all the air out so when the pressure comes on ,then the pistons compress, also if the old discs were worn then the new ones will be wider in compararison and so if you force them in, you are possibly risking damage to pads and even unsettling the shims.
The latter on my Sachs weren't seated properly when I extricated it from the shed after 2 years hybernation , having finally got the Maxistyre fittied.
the Gremeca brakes don't work as a conventional system, and are easy enough to refit when you know how.
The video I found the guy just said pop then in as they came out.
They fell out and the only reason I took the wheel out was because to make it original again the stock airbox would not go back in otherwise.
Also the previous owner had copied a workshop manual, and guess what there was a big so lodge over the bit I needed to see,
so I learned the hard way ,as a bang announced when running it on the side stand in gear the mounting bracket had snapped, and welding alloy is a specialist job, so I managed to get the whole unit NOS from Germany, where the bikes were made, however the brakes are Spanish in origin.
|
|
|
|
Post by bev on Apr 29, 2016 9:40:44 GMT
But if you're only expelling the air you'll know that the brakes work prior to fitting the new disk. You'd open the pads enough to fit your wheel if you removed it for a tyre or a deep clean so why not for this ?
I still don't see a down side. I've often removed the wheels without re-bleeding the brakes.
|
|
|
|
Post by GAv on Apr 29, 2016 10:06:55 GMT
Me too all I am saying is it's a whole lot easier if you wait and do the job all in one go.
|
|
|
|
Post by bev on Apr 29, 2016 10:13:47 GMT
Me too all I am saying is it's a whole lot easier if you wait and do the job all in one go. Some of us can't wait.
Though to be honest how many miles must that D9 have on it to have a worn out rear disk. 
Either that or a rider who rested their foot on the rear brake pedal.
|
|
|
|
Post by PrincessPunk on Apr 29, 2016 10:18:13 GMT
i had started off but just trying to clean the brake and make sure the calliper worked properly when the piston went tits up (it wouldnt move in the first place) so to get it properly fixed it had to be bled since i had to take the calliper off to get the pistons in and put it back on the bike to pump it out again, making sure it had a good action instead of doing it later and getting brake fluid and other assorted horribleness all over my new disc and pads. i dont see how it would affect anything other than having to push the pistons in a little again to put the new disc and pads in, and thankfully not what i've fixed it, the pistons are able to be pushed back easy since i said about heating the calliper i've found out what is more accurate is i just sort of warmed it up. nowhere near enough heat to damage anything, it was not even close the the normal operating temperature of the brake, just instead of the metal freezing my hands while i worked it was more comfortable to hold haha. although i am considering replacing the seals, but since the brake works for now i'm not going to open that can of worms, just going to keep my eye on it |
|
|
|
Post by satnav on Apr 30, 2016 7:50:23 GMT
But if you're only expelling the air you'll know that the brakes work prior to fitting the new disk. You'd open the pads enough to fit your wheel if you removed it for a tyre or a deep clean so why not for this ? I still don't see a down side. I've often removed the wheels without re-bleeding the brakes. As much as it pains me, I have to agree with you on this one. I find the most effective way to bleed brakes is to clamp the calipers in place so they can't move. In fact on some Mercedes-Benz Abs systems it is the only way you can do it. |
|
|
|
Post by GAv on Apr 30, 2016 13:42:14 GMT
Yep and also they are dual circuit which motorbikes are rarely if at all, I do not mean linked breaks like on my 500 scooter either..
Also on a technicality, cars tend to have their brake systems adjoined to a revolving shaft or transaxle whereas the caliper on bikes is bolted to the forks stantion, and the drum or disc to the actual wheel, Outback that doesnt revolve with the shaft as such but upo itand apart from say Rover P6s with De Dion Tubes or the similar in swinging arm form to house the disc inboard on EType Jags, Mk10, SType 420s 420Gs and Daimler V8s all had inboard rear discs and so has my Aprilia Furura with a single swingarm that enables you to remove the rear wheel, plus leaving disc sprocket and stuff in situ cannnot think of anything this side of a Porsche Speedster, Panhard and such(Trucks used to have split rims and it was illegal to change them without expert assistance back in my day and you had to release all the water that built up in the system via a compressed tank before you could safely drive off, every day.)
It seems we all have different ways of getting around things but my Maxim is generally do it once and do it right and if you dunna know what yer doing get someone who does,to help.
|
|


 everything had just got me so confused and there was so much conflicting (or zero) information and stuff that i just had not a clue how the rear worked. now i know i can get it sorted easy and with just the one valve
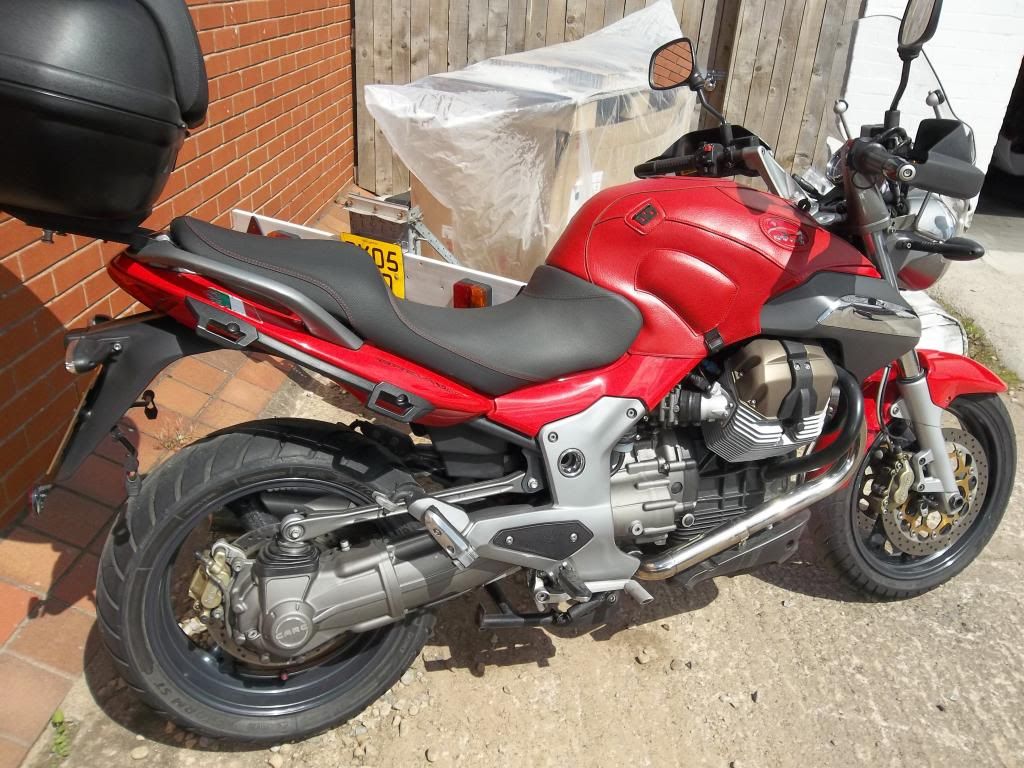

 I've got an impact driver and a like 3 foot long torque wrench so I think if I can be smart and quick about it I should get them out